Monday, December 24, 2012

Cisco Switches Commands (Daily)

SW3#show vlan brief
SW3#conf t
Enter configuration commands, one per line. End with CNTL/Z.
SW3(config)#int fa0/2
SW3(config-if)#switchport access vlan 10
SW3(config-if)#spanning-tree portfast
SW3(config-if)#spanning-tree bpduguard enable
SW3(config-if)#do show vlan brief

show interfaces status err-disabled
show errdisable flap-values

2ndFl_ONM_SW(config)# errdisable recovery cause ?
2ndFl_ONM_SW(config)# errdisable recovery cause link-flap
show errdisable recovery
show interfaces gigabitethernet 0/7 status
show etherchannel summary
no errdisable detect cause inline-power 

hxxp://www.cisco.com/en/US/tech/tk389/tk621/technologies_tech_note09186a00806cd87b.shtml

-------------------------------------------------------------------------------------------------------
#host -t a www.msn.com
#whois x.x.x.x | grep CIDR
-------------------------------------------------------------------------------------------------------
iptables -L -n
iptables -L -v -n --line-numbers
-------------------------------------------------------------------------------------------------------
Command to enable proxy usage:
reg add "HKCU\Software\Microsoft\Windows\CurrentVersion\Internet Settings" ^
    /v ProxyEnable /t REG_DWORD /d 1 /f
 
Command to disable proxy usage:
reg add "HKCU\Software\Microsoft\Windows\CurrentVersion\Internet Settings" ^
    /v ProxyEnable /t REG_DWORD /d 0 /f
 
Command to change the proxy address:
reg add "HKCU\Software\Microsoft\Windows\CurrentVersion\Internet Settings" ^
    /v ProxyServer /t REG_SZ /d 192.168.100.1:8080 /f
 
----------------------------------------------------------------------------
sh mac address-table
sh mac address-table dynamic 
sh mac address-table dynamic interface gigabitEthernet 0/34
clear mac address-table dynamic interface gigabitEthernet 0/34
clear mac address-table dynamic ?
clear mac address-table dynamic vlan 7
 

Sunday, December 23, 2012

WCCP 2, Squid, ASA 5510

TCP_Miss: Direct = not in cache and going direct with out through parent cache
TCP_MEM_HIT:NONE = object is stored in the memory
TCP_CLIENT_REFRESH_MISS:DIRECT = browser hit refresh 
----------------------------------------------------------------------------------------------------
vi    /etc/rc.local
modprobe ip_gre
ip tunnel add wccp0 mode gre remote (ASA Inside IP) local (Squidbox IP) dev eth0
ifconfig wccp0 (Squidbox IP) netmask 255.255.255.255 up
echo 0 >/proc/sys/net/ipv4/conf/wccp0/rp_filter
echo 0 >/proc/sys/net/ipv4/conf/eth0/rp_filter
echo 1 > /proc/sys/net/ipv4/ip_forward
--------------------------------------------------------------------------------------------------------
 vi    /etc/sysconfig/iptables
iptables -t nat -A PREROUTING -i wccp0 -p tcp --dport 80 -j REDIRECT --to-port 8080
iptables -t nat -A POSTROUTING -j MASQUERADE
----------------------------------------------------------------------------------------------------------
vi   /etc/squid/squid.conf
http_port 8080 transparent
wccp2_router (ASA Inside IP)
wccp2_forwarding_method 1
wccp2_return_method 1
wccp2_service standard 0 password=foo
----------------------------------------------------------------------------------------------------------
ASA 5510 Config
(Allow specific subnet)
access-list wccp_redirect extended deny ip host 192.168.10.15 any
access-list wccp_redirect extended permit tcp workstations 255.255.255.0 any eq www


(Allow everyone)
wccp web-cache
OR

wccp web-cache redirect-list wccp_redirect password foo <- br="br" password="password" with="with">
wccp interface inside web-cache redirect in

Wednesday, December 5, 2012

Realy Host Postfix MTA

main.cf
#relayhost = [ny-cas-2k8.mmx.com]:25
transport_maps = hash:/etc/postfix/transport
-----------------------------------------------------------------
vi  /etc/postfix/transport

*    smtp:[192.168.10.36]:25

postmap /etc/postfix/transport

Monday, October 29, 2012

Setting Up Linux OS based Postfix As A Backup MX


In this tutorial I will show how you can set up a Postfix mailserver as a backup mail exchanger for a domain so that it accepts mails for this domain in case the primary mail exchanger is down or unreachable, and passes the mails on to the primary MX once that one is up again.
I do not issue any guarantee that this will work for you!

1 Preliminary Note

I want to set up a backup MX for the domain example.com. In this example the primary MX for example.com is called mx1.example.com (IP address 1.2.3.4), so I call the backup MX mx2.example.com (IP address 1.2.3.5).
I have created MX records for example.com that look like this:
example.com.               86400   IN      MX      10 mx1.example.com.
example.com.               86400   IN      MX      20 mx2.example.com.
It's important that the primary MX has a lower number (10) and therefore a higher priority than the backup MX (20).
I'm assuming that the Postfix on mx2.example.com is already installed and working.

2 Configuring Postfix On mx2.example.com

To make mx2.example.com a backup MX for the domain example.com, all we have to do is change/add three lines to /etc/postfix/main.cf:
vi /etc/postfix/main.cf
First make sure that smtpd_recipient_restrictions contains permit_mynetworks and reject_unauth_destination, so something like this would be ok:

[...]
smtpd_recipient_restrictions = permit_sasl_authenticated,
permit_mynetworks, reject_unauth_destination
[...]

Then we must add example.com to the relay_domains paramater; if there's no relay_domains paramater yet in /etc/postfix/main.cf, the following will do:

[...]
relay_domains = $mydestination, example.com
[...]
 
And finally we add an empty relay_recipient_maps parameter to
/etc/postfix/main.cf:
 
[...]
relay_recipient_maps =
[...] 

(That way we don't have to specify a list of valid email addresses to back up, which might be a daunting task if you have to manage hundreds of email accounts.)
There's one important thing I have to add: You must not list example.com in the following parameters in /etc/postfix/main.cf:
  • mydestination
  • virtual_alias_domains
  • virtual_mailbox_domains
That's it already. All we have to do now is restart Postfix:

/etc/init.d/postfix restart

3 Testing

To test the new backup MX, we take down the MTA (Postfix, Sendmail, Exim, etc.) on mx1.example.com and send an email from some remote server to an example.com account (e.g. someuser@example.com).

If you have access to the mail log on the remote (sending) server, you should now find something like this in it:
Jun 6 18:29:16 mail postfix/smtp[17746]: AF814144146: to=, relay=mx2.example.com[1.2.3.5], delay=1, status=sent (250 2.0.0 Ok: queued as DCA5A1BF40F) 

As you see, the mail has been sent to mx2.example.com instead of mx1.example.com because mx1.example.com is unreachable. Now, let's take a look at the mail log of mx2.example.com:

Jun 6 18:29:16 mx2 postfix/qmgr[3049]: DCA5A1BF40F: from=, size=892, nrcpt=1 (queue active)
Jun 6 18:29:16 mx2 postfix/smtpd[3051]: disconnect from mail.blabla.tld[1.2.3.6]
Jun 6 18:29:16 mx2 postfix/smtp[3057]: connect to mx1.test1.de[1.2.3.4]: Connection refused (port 25)
Jun 6 18:29:16 mx2 postfix/smtp[3057]: DCA5A1BF40F: to=, relay=none, delay=0.07, delays=0.03/0.02/0.01/0, dsn=4.4.1, status=deferred (connect to mx1.test1.de[1.2.3.4]: Connection refused)

mx2.example.com has accepted the mail and tried to connect to mx1.example.com to deliver it to the primary MX. Because the primary MX is down, mx2.example.com cannot deliver the mail and keeps it in the mailqueue until mx1.example.com is available again.
Now we start the MTA on mx1.example.com again. The backup MX will not immediately deliver the queued mail, but after some minutes you should see something like this in the mail log of mx2.example.com:

Jun 6 18:56:44 mx2 postfix/qmgr[3080]: DCA5A1BF40F: from=, size=892, nrcpt=1 (queue active)
Jun 6 18:56:45 mx2 postfix/smtp[3083]: DCA5A1BF40F: to=, relay=mx1.example.com[1.2.3.4]:25, delay=1648, delays=1648/0.09/0.4/0.12, dsn=2.0.0, status=sent (250 2.0.0 Ok: queued as 167995B0109)

The mail has been delivered to the primary MX where you can see this in the mail log:
Jun 6 18:56:45 mx1 postfix/local[4963]: 167995B0109: to=, orig_to=, relay=local, delay=0.54, delays=0.08/0.02/0/0.43, dsn=2.0.0, status=sent (delivered to command: /usr/bin/procmail -f-)

So no mails were lost while mx1.example.com was down, and users can continue to retrieve their mails from mx1.example.com.

Thursday, October 18, 2012

Exchange 2010 Messages Stuck in Retry status in "MapiDeliveryQueue"

In case your Exchange admin life wasn't difficult enough, you can always have this problem, manifested with the following symptoms:

- Mail delivery hung
- Messages stuck in local delivery "MapiDeliveryQueue" with a status of "Retry"

Classic tactics such as restarting the server or right-clicking the queue and selecting "Retry" have no effect.

The key here is that Exchange 2007 and later treat these messages differently than standard SMTP queues. In order to process these messages, they need to be re-submitted using the following Exchange cmdlet:

Retry-Queue -Filter {Status -eq "Retry"} -Server "exchangeserver" -resubmit $true

The default re-submit queue time is 12 hours. To modify this:

1. Using Notepad, edit the file: C:\Program Files\Microsoft\Exchange Server\V14\Bin\EdgeTransport.exe.config.
2. Modify the following line in the section:


3. Save the file.
4. Open up the Exchange Command shell and run restart-service *rt

Tuesday, October 9, 2012

Recent Useful Commands

Check Maillog and Mail Queue (Postfix Mail Server)
#mailq
 #tail  -f   /var/log/maillog

Delete a message from postfix mail queue

 #postsuper   -d  1FD3D2F8BAE <---- MailID

Flush Messages
#postfix   flush


find out about your Postfix version to make sure it supports custom bounce messages:

postconf -d | grep mail_version
 
maximal_queue_lifetime: The maximal time a message is queued before it is sent back as undeliverable.
delay_warning_time: The time after which the sender receives the message headers of mail that is still queued.

The postconf -n command shows the settings that are currently configured in /etc/postfix/main.cf, whereas the postconf -d command shows the default settings that are valid unless something else is set in /etc/postfix/main.cf.

To find out about the current value of maximal_queue_lifetime, you can run

postconf -d | grep maximal_queue_lifetime
postconf -n | grep maximal_queue_lifetime 

If postconf -n doesn't display anything, this means the value from postconf -d is currently being used:

server2:~# postconf -d | grep maximal_queue_lifetime
maximal_queue_lifetime = 5d
server2:~# postconf -n | grep maximal_queue_lifetime
server2:~# 

The same goes for delay_warning_time:
postconf -d | grep delay_warning_time
postconf -n | grep delay_warning_time

server2:~# postconf -d | grep delay_warning_time
delay_warning_time = 0h

server2:~# postconf -n | grep delay_warning_time
server2:~#

If you want to modify these settings, you can use the postconf -e command. It will write the settings to /etc/postfix/main.cf, e.g. like this:

postconf -e 'maximal_queue_lifetime = 1d'
postconf -e 'delay_warning_time = 0h'


Parameters minimal_backoff_time, maximum_backoff_time and queue_run_delay
maximal_backoff_time (default: 4000s)
The maximal time between attempts to deliver a deferred message.

This parameter should be set to a value greater than or equal to
$minimal_backoff_time. See also $queue_run_delay.
Time units: s (seconds), m (minutes), h (hours), d (days), w
(weeks). The default time unit is s (seconds).
-----------------------------------------------------------------------------------------------------------

Windows 2003 commands

Check local users & groups
#lusrmgr.msc
#net  user
 
Change properties local users
#control   userpasswords2

security\Sam\domain\account\users\names


Monday, August 27, 2012

SONY VAIO G218LN

Issue

The Fn button of my Vaio VGN-CR353 is not working. I've just installed Windows 7 ultimate x86.

Solution

  • Go to Run and type services.msc and click ok
  • Look for the Vaio event service .Right click and change the startup type to automatic .


If it still don't work:

Wednesday, August 15, 2012

Allow ICMP Windows 2008 (Earlier Version)

1. Open command prompt (cmd).

2. Enter the following command,
netsh firewall set icmpsetting 8

Additional note, you may disable it by typing the following line.
netsh firewall set icmpsetting 8 disable

Otherwise, you may use the following step.
1. Open Run command.
2. Run firewall.cpl and enter.
3. Select with Windows Firewall with additional security.
4. Enable “file and printer sharing (ICMP requestv4)”


Tuesday, July 17, 2012

Turn on / Off Photos in Outlook 2007/2010

TurnOffPhotograph Registry Value

To edit the registry, go to Start menu, Run (keyboard shortcut: Windows key + R) and type regedit in the Run field then press Enter.
HKEY_CURRENT_USER\Software\Policies\Microsoft\Office\14.0\Common
DWORD: TurnOffPhotograph
Value: 1 or 0

Value of 1 = Contact photos are not displayed in the People Pane. If you are using Outlook 2010, they are also not displayed in the header of email messages and the Outlook contact cardValue of 0 = The Outlook Social Connector displays contact photos in the People Pane.
This key also work in Outlook 2007. There you'll use
HKEY_CURRENT_USER\Software\Policies\Microsoft\Office\12.0\Common
  
Contact picture displayed in e-mail header
All e-mail messages received from a contact for which you have a picture will display the contact’s picture to the right of the message header. To disable this feature, deploy the following registry data:
Key: HKCU\Software\Microsoft\Office\12.0\Outlook\Options\Mail
DWORD: ShowContactPicture
Values:1 (or missing DWORD) = show contact picture if available
0 = do not show contact picture

Can't display excel sheet within Word (EMBED Excel.Sheet.8)

Press Alt+F9 to switch between display of field codes (what you see now)

and field results (the Excel spreadsheet). 

Check add-on for Outlook 2007

Try Tools-->Options.
Click Other.
Click Advanced Options.
Click COM Add Ins.
 

Wednesday, June 27, 2012

Useful Commands

Exchange 2010 Mailbox
Get-MailboxStatistics zawhtet | ft DisplayName, TotalItemSize, ItemCount

Check All the Mailbox Size (Need to type on MailboxServer)

Get-MailboxDatabase | Get-MailboxStatistics | Sort totalitemsize -desc | ft displayname, totalitemsize, itemcount > d:\Database.txt

systeminfo

netstat -a -o -n  <==== check all the ports listening
netstat -ab

Windows XP, 2003 System State Backup
#ntbackup backup systemstate /J "System state backup Job" /F "E:\system-state-backup.bkf"

Windows 2008, 2008 R2 System State Backup
#C:\>WBADMIN   START    SYSTEMSTATEBACKUP         -backuptarget:E:

Using "MAC OF" to flood mac-address on Switch
macof    -i   eth1    -n    5

Clear Outlook2010 Temp Folder
ATTRIB "C:\Users\%username%\AppData\Local\Microsoft\Windows\Temporary Internet Files\Content.Outlook\*.*" -R /s

del "C:\Users\%username%\AppData\Local\Microsoft\Windows\Temporary Internet Files\Content.Outlook\" /s /q

Outlook 2010 diagnostic Mode
C:\Program Files (x86)\Microsoft Office\Office14>outlook.exe /rpcdiag

OR,

Press WinKey+R. In the Open field, type outlook.exe /resetnavpane


OR,
Press WinKey+R. In the Open field, type regedit and hit Enter
Delete the following key to delete profile, once deleted re-create the profile.

HKEY_CURRENT_USER\Software\Microsoft\Windows NT\ CurrentVersion\Windows
Messaging Subsystem\ Profiles

Turn On System Protection Windows 7 (PowerShell)
 
disable-computerrestore "C:"
To enable System Restore:
enable-computerrestore "C:"
Command to set diskpace used for previous files versions (example):
vssadmin Resize ShadowStorage /For=C: /On=C: /Maxsize=5%
or

vssadmin Resize ShadowStorage /For=C: /On=C: /Maxsize=10GB
 
--------------------------------------------------------------------------------
        
When you open System Properties and select the System Protection tab, the Create button may be grayed out, and the following message is displayed:
Restore point creation disabled by Group Policy

As a result, you’re unable to create System Restore Points or configure System Restore.

Resolution

This happens if the Turn off Configuration Policy is enabled in your system, either using Group Policy or through registry edit. For standalone Windows Vista systems, use these steps:
Using the Group Policy Editor
If your edition of Windows Vista includes the Group Policy Editor snap-in (gpedit.msc), follow these steps:
1. Click Start, type gpedit.msc and press ENTER
2. Go to the following branch:
Computer Configuration | Administrative Templates | System | System Restore
3. Double-click Turn off Configuration and set it to Not configured.
Note: If the above setting is already set to Not configured, set it to Enabled and click Apply. Then revert back the setting to Not configured, and click Apply, OK.
4. Exit the Group Policy Editor.
Using the Registry Editor
1. Click Start, type regedit.exe and press ENTER
2. Navigate to the following key:
HKEY_LOCAL_MACHINE \ Software \ Policies \ Microsoft \ Windows NT \ SystemRestore
3. In the right-pane, delete the value named DisableConfig
4. Exit the Registry Editor.
Registry Fix
To automate the above setting, download srpol-clear.reg and save to Desktop. Right-click on the file and choose Merge.

More Information

If you set the Turn of configuration option to Enabled, the option to configure System Restore on the Configuration Interface disappears. If the Turn off Configuration setting is disabled, the configuration interface is still visible, but all System Restore configuration defaults are enforced, and the Create button is grayed out. If you set it to Not configured, the configuration interface for System Restore remains, and the user has the ability to configure System Restore.

Edit "Hosts" File under C:\windows\System32\Drivers\etc\hosts with command

echo 1.2.3.4 hostname.domain.com >> %windir%\system32\drivers\etc\hosts

Friday, June 22, 2012

Disable Access on all the drives (local or within domain network)

Now navigate to User Configuration \ Administrative Templates \ Windows Components \ Windows Explorer. Then on the right side under Setting, double click on Prevent access to drives from My Computer.

Disable UAC via AD GPO


Turn off UAC on Windows 7

Disable UAC with Registry Editor (RegEdit)
  1. Run Registry Editor (RegEdit).
  2. Navigate to the following registry key: HKEY_LOCAL_MACHINE\Software\Microsoft\Windows\CurrentVersion\Policies\System
  3. Locate the following REG_DWORD value: EnableLUA
  4. Set the value of EnableLUA to 0.
  5. Optional step to suppress UAC consent prompt dialog, locate the following REG_DWORD value: ConsentPromptBehaviorAdmin
  6. Set the value of ConsentPromptBehaviorAdmin to 0 (optional).
  7. Exit from Registry Editor and restart the computer to turn off UAC.
Turn Off UAC Using Group Policy
For Windows 7 Ultimate, Business or Enterprise edition which has Local Group Policy, or computer joined to domain and has Active Directory-based GPO, the group policy can be used to disable UAC for local computer or many computer across large networks at once.
  1. Enter GPedit.msc in Start Search to run Local Group Policy editor. (Or gpmc.msc to run Group Policy Management Console for AD-based domain GPO editor).
  2. Navigate to the following tree branch: Computer Configuration -> Windows Settings -> Security Settings -> Local Policies -> Security Options
    In GPMC, browse to the required GPO which is linked to the domain or OU where the policy wants to apply.
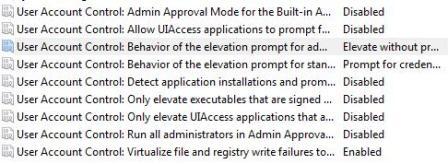
  3. Locate the following policy in the right pane: User Account Control: Behavior of the elevation prompt for administrators in Admin Approval Mode
    Set its value to Elevate without prompt.
  4. Locate the following policy in the right pane: User Account Control: Detect application installations and prompt for elevation
    Set its value to Disabled.
  5. Locate the following policy in the right pane: User Account Control: Run all administrators in Admin Approval Mode
    Set its value to Disabled.
  6. Locate the following policy in the right pane: User Account Control: Only elevate UIAccess applications that are installed in secure locations
    Set its value to Disabled.
  7. Disable UAC with Group Policy Restart the computer when done.
Method 4: Using Command Prompt to Disable User Account Control
The command line option can also be used in batch script command file, i.e. .bat and .cmd files, providing greater convenient to advanced technical user. In actual, the commands,, which are also used to disable or enable UAC in Vista, are just doing the same thing as directly modifying the registry.
  1. Open an elevated command prompt as administrator.
  2. To disable the UAC, run the following commands: %windir%\System32\cmd.exe /k %windir%\System32\reg.exe ADD HKEY_LOCAL_MACHINE\SOFTWARE\Microsoft\Windows\CurrentVersion\Policies\System /v EnableLUA /t REG_DWORD /d 0 /f
    and optionally, the following comand to suppress all elevation consent request and notification:
    %windir%\System32\cmd.exe /k %windir%\System32\reg.exe ADD HKEY_LOCAL_MACHINE\SOFTWARE\Microsoft\Windows\CurrentVersion\Policies\System /v ConsentPromptBehaviorAdmin /t REG_DWORD /d 0 /f
    Tip: To re-enable UAC, the command is:
    %windir%\System32\cmd.exe /k %windir%\System32\reg.exe ADD HKEY_LOCAL_MACHINE\SOFTWARE\Microsoft\Windows\CurrentVersion\Policies\System /v EnableLUA /t REG_DWORD /d 1 /f
    and to turn on prompt for consent UI:
    %windir%\System32\cmd.exe /k %windir%\System32\reg.exe ADD HKEY_LOCAL_MACHINE\SOFTWARE\Microsoft\Windows\CurrentVersion\Policies\System /v ConsentPromptBehaviorAdmin /t REG_DWORD /d 2 /f
Disable UAC may cause gadget not working in Windows 7. User who facing the issue can use another workaround to suppress User Account Control.

Monday, June 4, 2012

OAB Error & Useful commands

get-mailboxDatabase
get-mailbox   "Database Name"     | FL OfflineAddressbook

Checking Offline Address Book
get-OfflineAddressBook  "Default Offline Address List" | FL Guid
get-OfflineAddressBook  |  fl Name,publicfolderdatabase
get-OfflineAddressBook | Update-OfflineAddressBook  -vb
get-OfflineAddressBook | Select Name,Server

get-addresslist  | fl  *ldap*, *guid*

Stop/Start File Distribution Service
net stop MSExchangeFDS
net start MSExchangeFDS


On PowerShell

Get_ExecutionPolicy  -List | FL
Set-ExecutionPolicy “RemoteSigned”


On Mailbox Server

Set-EventLogLevel -Identity "MSExchangeSA\OAL Generator" -Level Expert -Confirm:$False

Group Policy (Windows 2008 R2)

gpedit.msc -> user configuration -> control panel -> personalization ->
Setting                                                    Status                     Option
-Enable screen saver                              Enable                    ----
-Password protect the screensaver         Enable                    ----
-Screen saver timeout                            Enable                     900
- Force specific screen saver                  Enable                    //192.168.20.246/Screensaver/showall.scr
--------------------------------------------------------------------------------------------------------
c:\>gpupdate  /force  /boot  /logoff
--------------------------------------------------------------------------------------------------------
gpedit.msc -> User Configuration -> administrative Templates -> Internet Explorer -> Disable Changing Proxy settings
--------------------------------------------------------------------------------------------------------
gpedit.msc -> Computer Configuration -> Administrative Templates -> Windows Components -> Windows Installer -> Prohibit User Installs
--------------------------------------------------------------------------------------------------------
system state backup from command in windows 2008
######################################################

wbadmin   start   systemstatebackup  -backupTarget:d:

#####################################################
IFM Backup

ntdsutil

ntdsutil:help
ntdsutil:IFM
ntdsutil:Activate Ins tance NTDS
ntdsutil:IFM
ifm:help
ifm:Create Sysvol Full F:\IFM

Saturday, June 2, 2012

Exchange Server 2010 OAB download fails when redirection is configured incorrectly in IIS 7

Microsoft Outlook users cannot download the Offline Address Book (OAB) from a server that is running Microsoft Exchange Server 2010.

This issue can occur if an HTTPS redirection is configured incorrectly in Internet Information Services (IIS) 7. If HTTPS redirection is configured incorrectly, Web.config files may be created in the following locations:
  • %programfiles%\inetpub\wwwroot
  • %programfiles%\microsoft\exchange server\client access\OAB
To resolve this issue, follow these steps:
  1. Remove the Web.config files that are not required. To do this, follow these steps:
    1. Click Start, click Run, type cmd, and then press Enter.
    2. At the command prompt, type the following commands, and press Enter after each command:
      • cd %windir%\system32\inetsrv
      • appcmd clear config "Default Web Site/oab" -section:defaultDocument
      • appcmd clear config "Default Web Site" -section:defaultDocument
    3. Delete the Web.config file in the following file system locations:
      • %programfiles%\microsoft\exchange server\client access\OAB
      • %programfiles%\inetpub\wwwroot
  2. Restart the IIS Admin service.
  3. Start Internet Information Services (IIS) Manager.
  4. Click Default Web Site, and then double-click HTTP Redirect.
  5. Click to clear the Redirect requests to this destination check box, and then click Apply.
  6. Repeat step 5 for all virtual directories.
  7. Reconfigure HTTPS redirection. For information about how to configure HTTPS redirection correctly, see the following article in the Microsoft Knowledge Base:
    975341 How to redirect requests from HTTP to HTTPS or to the OWA virtual directory in IIS 7
    Note When you follow the steps in the "Resolution" section for KB 975341, verify that you click to select the Only redirect requests to content in this directory (not subdirectories) check box.
  8. Restart the IIS Admin service.

Wednesday, May 30, 2012

How to replace Dell MD3200 Failed Battery Pack

One of the RAID Controller’s battery on my Dell PowerVault MD3200 has failed today so I got a replacement part to replace it.
Replacing the battery requires detaching the RAID Controller from the MD3200.  However, there was no down time because the other RAID Controller is still functioning.  We just need to make sure all the disk groups have been changed over to the working RAID Controller by using the PowerVault Modular Disk Storage Manager in the Logical View.
Then in the Physical view, select the RAID Controller to be removed.

Click on the Advanced menu and select Recovery –> Place RAID Controller Module –> Offline.  This will place the RAID Controller offline and we are ready to remove it.

This is how the RAID Controller with the battery removed looks like.

The high speed 8GB SDHC card on the RAID Controller.


The battery pack.

After replacing the the battery pack, reinsert the RAID Controller back and place it online.  Wait for a few minutes and everything is back to normal.

Monday, May 28, 2012

explorer.exe error on windows 7

Here's how to fix this issue:
1. CTRL-Alt-Del to bring up Task Manager.
2. Click File | New Task(run).
3. Type regedit in the Run box and click OK.
4. Browse to the following registry key:
HKEY_LOCAL_MACHINE\SOFTWARE\Microsoft\Windows NT\CurrentVersion\Image File Execution.options
5. Under this key there will be subkeys named explorer.exe and iexplorer.exe. Delete the explorer and iexplorer keys entirely. They should not be listed under the Image File Execution.Options key.
6. Close the Registry Editor.
7. Restart the computer.
Assuming no other viruses / adware / spyware / malware are interfering, the Windows desktop should load fine now.

OR

hxxp://en.kioskea.net/forum/affich-9082-explorer-exe-corrupted-or-infected
Click Start.
In the Search Bar, type regedit and press Enter.
Locate the following key: HKEY_LOCAL_MACHINE\SOFTWARE\ Microsoft\ SQMClient\Windows\DisabledSessions
In the right pane delete this subkey: MachineThrottling
Turn your computer off and back on for the change to take effect.

OR

HKEY_LOCAL_MACHINE\SOFTWARE\Microsoft\Windows NT\CurrentVersion\Winlogon\Shell <- Check "explorer.exe"

OR

1. insert Windows 7 installer DVD
2. Browse DVD -> You find folder name "sources"
3.Then you will find "install.wim"
4. Extract with "7 Zip" software
5. under "Windows" Folder -> explorer.exe -> copy to c:\files
6. under "Windows\system32\" Folder -> shell32.dll -> copy to c:\files
7. On your machine, do the followings

c:\windows>takeown   /f      explorer.exe
c:\windows>icacls      explorer.exe            /grant          zawhtet:F
c:\windows>rename   explorer.exe             explorer.exe_old
c:\windows>move      explorer.exe_old      c:\files
c:\files>copy               explorer.exe             c:\windows\


c:\windows\system32> takeown    /f    shell32.dll
c:\windows\system32>icacls         shell32.dll           /grant         zawhtet:F
c:\windows\system32>rename       shell32.dll           shell32.dll_old
c:\windows\system32>move          shell32.dll             c:\files
c:\files>copy               shell32.dll                c:\windows\system32\


Restart your Windows 7 Computer and check the status. Good Luck !

One more thing, you got to run these commands on "Local Administrator's command prompt"
OR
Start -> Run -> cmd -> right click -> run as administrator
OR
Start -> Run -> cmd -> ctl+shift+Enter

Wednesday, May 23, 2012

VMWare ESX 4 (Commmands)


Configuring networking from the ESX service console command line
To configure networking from the ESX service console command line:
  1. Ensure the network adapter you want to use is currently connected with the command:

    [root@server root]# esxcfg-nics –l

    The output appears similar to:

    Name PCI Driver Link Speed Duplex Description
    vmnic0 06:00.00 tg3 Up 1000Mbps Full Broadcom Corporation NetXtreme BCM5721 Gigabit Ethernet
    vmnic1 07:00.00 tg3 Up 1000Mbps Full Broadcom Corporation NetXtreme BCM5721 Gigabit Ethernet

    In the Link column, Up indicates that the network adapter is available and functioning.
  1. List the current virtual switches with the command:

    [root@server root]# esxcfg-vswitch –l

    The output appears similar to:

    Switch Name Num Ports Used Ports Configured Ports Uplinks
    vSwitch0 32 3 32 vmnic0

    PortGroup Name Internal ID VLAN ID Used Ports Uplinks
    VM Network portgroup2 0 0 vmnic0

    In the example output, there exists a virtual machine network named VM Network with no Service Console portgroup. For illustration, the proceeding steps show you how to create a new virtual switch and place the service console port group on it.
  2. Create a new virtual switch with the command:

    [root@server root]# esxcfg-vswitch –a vSwitch1
  3. Create the Service Console portgroup on this new virtual switch:

    [root@server root]# esxcfg-vswitch –A “Service Console” vSwitch1

    Because there is a space in the name (Service Console), you must enclose it in quotation marks.

    Note: To create Service Consoles one at time, you may need to delete all previous settings. For more information, see
    Recreating Service Console Networking from the command line (1000266).
  4. Up-link vmnic1 to the new virtual switch with the command:

    [root@server root]# esxcfg-vswitch –L vmnic1 vSwitch1
  5. If you need to assign a VLAN, use the command:

    [root@server root]# esxcfg-vswitch -v -p “Service Console” vSwitch0

    where is the VLAN number. A zero here specifies no VLAN.
  6. Verify the new virtual switch configuration with the command:

    [root@server root]# esxcfg-vswitch –l

    The output appears similar to:

    Switch Name Num Ports Used Ports Configured Ports Uplinks
    vSwitch0 32 3 32 vmnic0

    PortGroup Name Internal ID VLAN ID Used Ports Uplinks
    Service Console portgroup5 0 1 vmnic0

    Switch Name Num Ports Used Ports Configured Ports Uplinks
    vSwitch1 64 1 64 vmnic1

    PortGroup Name Internal ID VLAN ID Used Ports Uplinks
    Service Console portgroup14 0 1 vmnic1
  7. Create the vswif (Service Console) interface. For example, run the command:

    [root@server root]# esxcfg-vswif –a vswif0 –i 192.168.1.10 –n 255.255.255.0 –p “Service Console”
    [‘Vnic’ warning] Generated New Mac address, 00:50:xx:xx:xx:xx for vswif0

    Nothing to flush.
  8. Verify the configuration with the command:

    [root@esx]# esxcfg-vswif –l
    Name Port Group IP Address Netmask Broadcast Enabled DHCP
    v
    swif0 Service Console 192.168.1.10 255.255.255.0 192.168.1.255 true false
  9. Verify the networking configuration on the ESX host. See Verifying ESX host networking configuration on the service console (1003796) .


Recreating Service Console networking from the command line
Note: ESX 4.0 Update 2 introduces a new tool that simplifies the process of creating or restoring networking in the ESX service console. For more information, see Configuring or restoring networking from the ESX service console using console-setup (1022078).

To delete and recreate a virtual switch and Service Console from the command line:

Note: On your system the vswif, vmnic, vSwitch numbers and network settings are different. 
  1. Run the following command to list the name of the vswif adapter:

    # esxcfg-vswif -l
  2. Run the following command to delete the vswif adapter:

    # esxcfg-vswif --del vswif0
  3. Run the following command to list the name of the vSwitch:

    # esxcfg-vswitch -l
  4. Run the following command to delete the vSwitch:

    # esxcfg-vswitch -d vSwitch0
  5. Run the following command to create the vSwitch:

    # esxcfg-vswitch -a vSwitch0
  6. Run the following commands to create default port groups for vSwitch:

    # esxcfg-vswitch -A "VM Network" vSwitch0
    # esxcfg-vswitch -A "Service Console" vSwitch0
  7. Run the following command to create the vswif adapter:

    # esxcfg-vswif --add --portgroup "Service Console" --ip=nnn.nnn.nnn.nnn --netmask=255.255.255.0 vswif0 
  8. Run the following command to verify that the settings in the network file are correct:

                # c
    at /etc/sysconfig/network

    NETWORKING=yes
    GATEWAYDEV=vswif0
    HOSTNAME=host.domain.com
    GATEWAY=nnn.nnn.nnn.nnn
  9. Run the following commands to list all of the network adapters and associate a vmnic which has a link status of up:

    # esxcfg-nics -l
    # esxcfg-vswitch -L vmnic1 vSwitch0
  10. Run the following command to verify that the vmnic is associated with the vSwitch:

    # esxcfg-vswitch -l
  11. Ping an IP address to check for network connectivity. If the ping fails, remove the previous vmnic from the vSwitch and try another adapter that has a link status of up.

    # esxcfg-vswitch -U vmnic1 vSwitch0
    # esxcfg-vswitch -L vmnic2 vSwitch0
  12. Run the following command to change the vlan ID of a vSwitch:

    # esxcfg-vswitch -p "VM Network 1" -v 10 vSwitch0
  13. If you make any manual changes to /etc/sysconfig/network, run the following command to restart the network service:

    # service network restart


Check All your VMs and ID

vim-cmd    vmsvc/getallvms  

Start The VM
vim-cmd    vmsvc/power.on   48

Stop The VM
vim-cmd    vmsvc/power.off   48

Restart The VM
vim-cmd    vmsvc/power.restart  48

If you need to restart your VM on a daily basis I would edit and add the cron job in:
vi   var/spool/cron/crontabs/root

List all the commands under 
vim-cmd vmsvc

List the vms & file path
vmware-cmd -l

Start the VM Machine
vmware-cmd "/vmfs/volumes/4c16a0ec-2c7ebe2a-6ad5-0011s8azz71c/OpenSolaris 2009.06/OpenSolaris 2009.06.vmx" start

Power-On or Off Status
vmware-cmd -l | sed '/^$/d' |  while read VMX ; do STATE=$(vmware-cmd  "${VMX}" getstate | awk ' { print $3 } ') ;  echo "${VMX}" = "${STATE}" ; done


Check Available Network Cards
esxcfg-nics -l
 
vm-support -x 
 
vm-support  -X   100 

vmware-cmd.pl   -H 192.168.1.1 -l zawhtet

Ref:hxxp://benincosa.org/blog/?p=266
ps -auxwww | grep 100
kill  -9  100