Wednesday, June 27, 2012

Useful Commands

Exchange 2010 Mailbox
Get-MailboxStatistics zawhtet | ft DisplayName, TotalItemSize, ItemCount

Check All the Mailbox Size (Need to type on MailboxServer)

Get-MailboxDatabase | Get-MailboxStatistics | Sort totalitemsize -desc | ft displayname, totalitemsize, itemcount > d:\Database.txt

systeminfo

netstat -a -o -n  <==== check all the ports listening
netstat -ab

Windows XP, 2003 System State Backup
#ntbackup backup systemstate /J "System state backup Job" /F "E:\system-state-backup.bkf"

Windows 2008, 2008 R2 System State Backup
#C:\>WBADMIN   START    SYSTEMSTATEBACKUP         -backuptarget:E:

Using "MAC OF" to flood mac-address on Switch
macof    -i   eth1    -n    5

Clear Outlook2010 Temp Folder
ATTRIB "C:\Users\%username%\AppData\Local\Microsoft\Windows\Temporary Internet Files\Content.Outlook\*.*" -R /s

del "C:\Users\%username%\AppData\Local\Microsoft\Windows\Temporary Internet Files\Content.Outlook\" /s /q

Outlook 2010 diagnostic Mode
C:\Program Files (x86)\Microsoft Office\Office14>outlook.exe /rpcdiag

OR,

Press WinKey+R. In the Open field, type outlook.exe /resetnavpane


OR,
Press WinKey+R. In the Open field, type regedit and hit Enter
Delete the following key to delete profile, once deleted re-create the profile.

HKEY_CURRENT_USER\Software\Microsoft\Windows NT\ CurrentVersion\Windows
Messaging Subsystem\ Profiles

Turn On System Protection Windows 7 (PowerShell)
 
disable-computerrestore "C:"
To enable System Restore:
enable-computerrestore "C:"
Command to set diskpace used for previous files versions (example):
vssadmin Resize ShadowStorage /For=C: /On=C: /Maxsize=5%
or

vssadmin Resize ShadowStorage /For=C: /On=C: /Maxsize=10GB
 
--------------------------------------------------------------------------------
        
When you open System Properties and select the System Protection tab, the Create button may be grayed out, and the following message is displayed:
Restore point creation disabled by Group Policy

As a result, you’re unable to create System Restore Points or configure System Restore.

Resolution

This happens if the Turn off Configuration Policy is enabled in your system, either using Group Policy or through registry edit. For standalone Windows Vista systems, use these steps:
Using the Group Policy Editor
If your edition of Windows Vista includes the Group Policy Editor snap-in (gpedit.msc), follow these steps:
1. Click Start, type gpedit.msc and press ENTER
2. Go to the following branch:
Computer Configuration | Administrative Templates | System | System Restore
3. Double-click Turn off Configuration and set it to Not configured.
Note: If the above setting is already set to Not configured, set it to Enabled and click Apply. Then revert back the setting to Not configured, and click Apply, OK.
4. Exit the Group Policy Editor.
Using the Registry Editor
1. Click Start, type regedit.exe and press ENTER
2. Navigate to the following key:
HKEY_LOCAL_MACHINE \ Software \ Policies \ Microsoft \ Windows NT \ SystemRestore
3. In the right-pane, delete the value named DisableConfig
4. Exit the Registry Editor.
Registry Fix
To automate the above setting, download srpol-clear.reg and save to Desktop. Right-click on the file and choose Merge.

More Information

If you set the Turn of configuration option to Enabled, the option to configure System Restore on the Configuration Interface disappears. If the Turn off Configuration setting is disabled, the configuration interface is still visible, but all System Restore configuration defaults are enforced, and the Create button is grayed out. If you set it to Not configured, the configuration interface for System Restore remains, and the user has the ability to configure System Restore.

Edit "Hosts" File under C:\windows\System32\Drivers\etc\hosts with command

echo 1.2.3.4 hostname.domain.com >> %windir%\system32\drivers\etc\hosts

Friday, June 22, 2012

Disable Access on all the drives (local or within domain network)

Now navigate to User Configuration \ Administrative Templates \ Windows Components \ Windows Explorer. Then on the right side under Setting, double click on Prevent access to drives from My Computer.

Disable UAC via AD GPO


Turn off UAC on Windows 7

Disable UAC with Registry Editor (RegEdit)
  1. Run Registry Editor (RegEdit).
  2. Navigate to the following registry key: HKEY_LOCAL_MACHINE\Software\Microsoft\Windows\CurrentVersion\Policies\System
  3. Locate the following REG_DWORD value: EnableLUA
  4. Set the value of EnableLUA to 0.
  5. Optional step to suppress UAC consent prompt dialog, locate the following REG_DWORD value: ConsentPromptBehaviorAdmin
  6. Set the value of ConsentPromptBehaviorAdmin to 0 (optional).
  7. Exit from Registry Editor and restart the computer to turn off UAC.
Turn Off UAC Using Group Policy
For Windows 7 Ultimate, Business or Enterprise edition which has Local Group Policy, or computer joined to domain and has Active Directory-based GPO, the group policy can be used to disable UAC for local computer or many computer across large networks at once.
  1. Enter GPedit.msc in Start Search to run Local Group Policy editor. (Or gpmc.msc to run Group Policy Management Console for AD-based domain GPO editor).
  2. Navigate to the following tree branch: Computer Configuration -> Windows Settings -> Security Settings -> Local Policies -> Security Options
    In GPMC, browse to the required GPO which is linked to the domain or OU where the policy wants to apply.
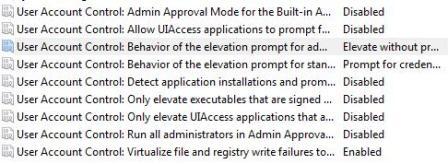
  3. Locate the following policy in the right pane: User Account Control: Behavior of the elevation prompt for administrators in Admin Approval Mode
    Set its value to Elevate without prompt.
  4. Locate the following policy in the right pane: User Account Control: Detect application installations and prompt for elevation
    Set its value to Disabled.
  5. Locate the following policy in the right pane: User Account Control: Run all administrators in Admin Approval Mode
    Set its value to Disabled.
  6. Locate the following policy in the right pane: User Account Control: Only elevate UIAccess applications that are installed in secure locations
    Set its value to Disabled.
  7. Disable UAC with Group Policy Restart the computer when done.
Method 4: Using Command Prompt to Disable User Account Control
The command line option can also be used in batch script command file, i.e. .bat and .cmd files, providing greater convenient to advanced technical user. In actual, the commands,, which are also used to disable or enable UAC in Vista, are just doing the same thing as directly modifying the registry.
  1. Open an elevated command prompt as administrator.
  2. To disable the UAC, run the following commands: %windir%\System32\cmd.exe /k %windir%\System32\reg.exe ADD HKEY_LOCAL_MACHINE\SOFTWARE\Microsoft\Windows\CurrentVersion\Policies\System /v EnableLUA /t REG_DWORD /d 0 /f
    and optionally, the following comand to suppress all elevation consent request and notification:
    %windir%\System32\cmd.exe /k %windir%\System32\reg.exe ADD HKEY_LOCAL_MACHINE\SOFTWARE\Microsoft\Windows\CurrentVersion\Policies\System /v ConsentPromptBehaviorAdmin /t REG_DWORD /d 0 /f
    Tip: To re-enable UAC, the command is:
    %windir%\System32\cmd.exe /k %windir%\System32\reg.exe ADD HKEY_LOCAL_MACHINE\SOFTWARE\Microsoft\Windows\CurrentVersion\Policies\System /v EnableLUA /t REG_DWORD /d 1 /f
    and to turn on prompt for consent UI:
    %windir%\System32\cmd.exe /k %windir%\System32\reg.exe ADD HKEY_LOCAL_MACHINE\SOFTWARE\Microsoft\Windows\CurrentVersion\Policies\System /v ConsentPromptBehaviorAdmin /t REG_DWORD /d 2 /f
Disable UAC may cause gadget not working in Windows 7. User who facing the issue can use another workaround to suppress User Account Control.

Monday, June 4, 2012

OAB Error & Useful commands

get-mailboxDatabase
get-mailbox   "Database Name"     | FL OfflineAddressbook

Checking Offline Address Book
get-OfflineAddressBook  "Default Offline Address List" | FL Guid
get-OfflineAddressBook  |  fl Name,publicfolderdatabase
get-OfflineAddressBook | Update-OfflineAddressBook  -vb
get-OfflineAddressBook | Select Name,Server

get-addresslist  | fl  *ldap*, *guid*

Stop/Start File Distribution Service
net stop MSExchangeFDS
net start MSExchangeFDS


On PowerShell

Get_ExecutionPolicy  -List | FL
Set-ExecutionPolicy “RemoteSigned”


On Mailbox Server

Set-EventLogLevel -Identity "MSExchangeSA\OAL Generator" -Level Expert -Confirm:$False

Group Policy (Windows 2008 R2)

gpedit.msc -> user configuration -> control panel -> personalization ->
Setting                                                    Status                     Option
-Enable screen saver                              Enable                    ----
-Password protect the screensaver         Enable                    ----
-Screen saver timeout                            Enable                     900
- Force specific screen saver                  Enable                    //192.168.20.246/Screensaver/showall.scr
--------------------------------------------------------------------------------------------------------
c:\>gpupdate  /force  /boot  /logoff
--------------------------------------------------------------------------------------------------------
gpedit.msc -> User Configuration -> administrative Templates -> Internet Explorer -> Disable Changing Proxy settings
--------------------------------------------------------------------------------------------------------
gpedit.msc -> Computer Configuration -> Administrative Templates -> Windows Components -> Windows Installer -> Prohibit User Installs
--------------------------------------------------------------------------------------------------------
system state backup from command in windows 2008
######################################################

wbadmin   start   systemstatebackup  -backupTarget:d:

#####################################################
IFM Backup

ntdsutil

ntdsutil:help
ntdsutil:IFM
ntdsutil:Activate Ins tance NTDS
ntdsutil:IFM
ifm:help
ifm:Create Sysvol Full F:\IFM

Saturday, June 2, 2012

Exchange Server 2010 OAB download fails when redirection is configured incorrectly in IIS 7

Microsoft Outlook users cannot download the Offline Address Book (OAB) from a server that is running Microsoft Exchange Server 2010.

This issue can occur if an HTTPS redirection is configured incorrectly in Internet Information Services (IIS) 7. If HTTPS redirection is configured incorrectly, Web.config files may be created in the following locations:
  • %programfiles%\inetpub\wwwroot
  • %programfiles%\microsoft\exchange server\client access\OAB
To resolve this issue, follow these steps:
  1. Remove the Web.config files that are not required. To do this, follow these steps:
    1. Click Start, click Run, type cmd, and then press Enter.
    2. At the command prompt, type the following commands, and press Enter after each command:
      • cd %windir%\system32\inetsrv
      • appcmd clear config "Default Web Site/oab" -section:defaultDocument
      • appcmd clear config "Default Web Site" -section:defaultDocument
    3. Delete the Web.config file in the following file system locations:
      • %programfiles%\microsoft\exchange server\client access\OAB
      • %programfiles%\inetpub\wwwroot
  2. Restart the IIS Admin service.
  3. Start Internet Information Services (IIS) Manager.
  4. Click Default Web Site, and then double-click HTTP Redirect.
  5. Click to clear the Redirect requests to this destination check box, and then click Apply.
  6. Repeat step 5 for all virtual directories.
  7. Reconfigure HTTPS redirection. For information about how to configure HTTPS redirection correctly, see the following article in the Microsoft Knowledge Base:
    975341 How to redirect requests from HTTP to HTTPS or to the OWA virtual directory in IIS 7
    Note When you follow the steps in the "Resolution" section for KB 975341, verify that you click to select the Only redirect requests to content in this directory (not subdirectories) check box.
  8. Restart the IIS Admin service.